Light and Telescopes
Introduction
Until photography was developed at the beginning of this century, the eye was an astronomer’s primary instrument. With it we discovered the Sun, the largest planets in our solar system, Kepler’s laws, Newton’s laws of motion and gravity, the Milky Way and other distant galaxies. Even aided by sophisticated satellites and electronic detectors, our eyes remain a crucial link for the interpretation of the accumulated data. This is an experiment to determine some of the characteristics of your eyes.
A Few Details
Our eyes are roughly spherical and about 1 inch in diameter. The front of the eye is covered by the cornea. Behind it, the aqueous humor fills the space to the iris and lens. The cornea and lens together form an image on the retina, which is a complex combination of light sensitive receptors and nerve fibers only about 0.3 mm thick. The receptors are actually located in the back of the retina, behind nerves, arteries and veins. Light must pass through layers of cells in order to be detected. The receptors are found in two different shapes, called rods and cones, which operate in two different ways. The rods are not sensitive to color, and are distributed over the entire retina except in the center of the fovea. The cones are color sensitive and are mostly in the fovea. The rods are also much more sensitive to light than the cones. Faint sources appear to be colorless. In all, there are over 100 million rods and 6.5 million cones in a typical retina, about 100,000 per mm2.
So the eye is basically a lens and a retina, with an iris that keeps the light on the retina constant by changing size in response to the brightness of the scene. Information from the retina is passed to the brain through the optic nerve, which is off center in the back of the eye.
Experimenting with a Lens
To see the nature of an image detected by the retina, let's begin by experimenting with a lens. For the lab we will have a mounted lens you may use like a magnifying glass You will also need a small ruler and there should be one on the table with the lens. Although you can use a ruler with English units, scientific measurements today are always made with metric units. You can convert English to metric easily since one inch is 2.54 centimeters or 25.4 millimeters. There are 100 centimeters in a meter, and 10 millimeters in one centimeter.
1. Describe the lens you are using. Give its diameter, how its surfaces are curved, and other information that someone would need to reproduce your observations.
Hold the lens up at arms length and look through it at something far away.
2. What do you see? Is the image upside down or rightside up? Is it larger or smaller than you would see without the lens?
3. Now bring the lens up very close to your eye and use it as a magnifier to look at your own thumb. Begin with your thumb an arms length from the lens, and bring your hand in until you see a clear image. How far from the lens is your thumb when the image is clearest? How much bigger does your thumb appear than it does without the lens?
4. Lastly, hold the lens in front of a piece of white paper so that light from a lamp or window far from the paper passes through the lens on the way to the paper. Begin with the lens on the paper and pull it away. At some point you'll see an image on the paper of the lamp. Describe the image, and give the distance from the paper to the lens when it is sharpest. You can see an example of how to do this with this short movie clip.
The distance you have just found is called the focal length of the lens. Lenses can be made with any focal length. A short focal length requires strongly curved surfaces, and a long focal length has surfaces that are less curved.
Spectacle lenses are similar to this simple magnifier, except both surfaces are curved to be nearly identical. If you wear glasses, take a look at yours and notice that the surface toward your eye is concave, like the inside of a bowl. The surface toward the world is convex, curved outward. The shapes of the surfaces are chosen so that you can look in different directions and still see a clear image, and the difference in their curvatures is adjusted to compensate for the focusing errors of your own eye. A lens which forms an image, like the magnifier, is needed to correct for nearsightedness. It adds to the eye's lens to bring distant objects into focus on the retina.
You need at least two lenses to make a telescope. One lens forms an image, just as you demonstrated with the lens in this experiment, except that image does not have to be on a piece of paper. You could put a detector there, like a "charge coupled device" that you could find in your cell phone camera, and measure the image electronically the way astronomers do now. Or, you could take another lens and use it like a magnifier to inspect the image formed by the first one. A diagram of the arrangement looks like this:
Telescopes

The lens on the right is the objective, the lens closest to the object being observed. The lens on the left is the eyepiece, closest to the eye and acting like a magnifier. The combination of lenses makes distant objects appear larger, and gathers all the light that enters the objective and delivers it to the observer's eye. It is in this action, as a "light funnel", that telescopes are most useful to astronomers. They collect light from distant objects and enable both imaging and analysis.
There will be a second smaller lens on the table that has a shorter focal length than the larger one. You can hold these up to make a simple telescope. Try it! Look outside and across the room. It will not have a lot of magnification, but it illustrates the idea.
While the first small telescopes were made with lenses, Isaac Newton and William Herschel discovered that better, bigger, ones could be made with mirrors. You can see how this might be done by looking at a makeup or shaving mirror if you have one at home. In the lab we have a concave telescope mirror you can experiment with.
Have someone hold the mirror for you and back away from it. With their help adjust so you can see yourself upside down in the mirror. Now slowly approach the mirror and at some point everything will become a blur. Go closer and you will see yourself right side up.
5. How far from the mirror were you when at this blurry point? That's the center of curvature of the mirror, the center of the sphere that is the mirror's surface, so this distance is the radius of the sphere.
Now take the mirror and hold it up so that light through a window falls on the mirror. Use a white file card and with help from another student adjust the mirror so that it forms an image of a distant building on the card. The image will be upside down, and you can get it to quite sharply defined.
6. How far from the mirror were you at this focal point? That's the focal length of the mirror. How does it compare to the radius of the sphere you measured for question 5?
A mirror such as this can be the objective of a telescope because it collects light and brings it to a focus, just like the magnifying glass lens did.
Magnification and Resolution
We have a Celestron Schmidt-Cassegrain telescope set up in the lab pointed at an artificial double star illuminated by a bright lamp. It takes a few minutes for the lamp to reach full brightness, so if it is not on you may want to turn it on now and come back to this later. If it is on, then do not turn it off so that others can do the experiment quickly.
You may need help from the lab assistant since this telescope has high magnification and pointing it at the "stars" takes care. If you have difficulty, we'll help you align it, and show you how to adjust the focus for the best image.
The telescope is 8 inches (about 20 centimeters) in diameter. In perfectly still air under ideal conditions, it could resolve less than 0.5 arcseconds, that is 0.00014 degree. You may notice that you can see details in the small punched holes that mimic a double star. The purpose of this part of the experiment is for you to see what happens to the image when the stars are viewed through smaller and smaller telescopes.
Take one of the paper plates and cut a hole about 2 inches (5 cm) in diameter. It doesn't have to be perfectly round to work. Hold it in front of the telescope and make sure that the hole is over the clear glass "corrector" lens of the telescope. For this to work, the hole will have to be off center, and the paper should cover the entire opening. It may be easier if one student looks while another holds this "mask" in place. You'll notice that the image will be dimmer, and that it will also be less distinct. Make several masks of decreasing hole size, and then
while one person is looking at the double star through the telescope, have another student change the size of the opening. You'll easily see it get fainter (that's expected since there is less opening to capture light), and it will also get fuzzier as you go to smaller diameter openings. At some point you will not be able to tell there are two stars, while for a larger opening they will be very clearly separated. Each star will look something like this:
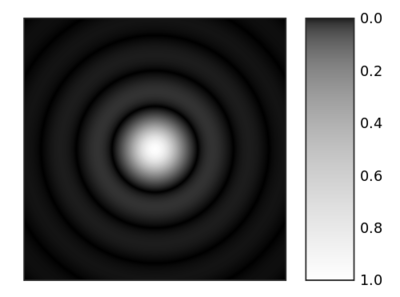
The rings of light are the diffraction pattern of the telescope's objective lens. The bigger the lens, the smaller this pattern. When the patterns of two nearby stars overlap such that the center of one falls in the dark ring around the other, the two stars can only just barely be distinguished. This condition is the Rayleigh Criterion for telescope resolution. For visible light it turns out that a telescope with 10 cm aperture will just resolve 1 arcsecond - that's 1/3600th of a degree.
7. What was the aperture that just resolved these artificial stars from one another?
The stars are only 8 arcseconds apart, but when you see them through the telescope they appear to be separated by far more than this. In fact, if you walk over and look at the artificial stars you'll see they are tiny holes in a metal strip, and even up close you can hardly tell there are two of them. The telescope magnifies the view, making the stars appear to be farther apart in angle than they actually are.
Some Properties of your Eyes
Blindspot
The diagram shows a cross and a dot on the screen. If you cannot see this well on your computer, you may print it using this pdf file that also contains other images you'll use later.
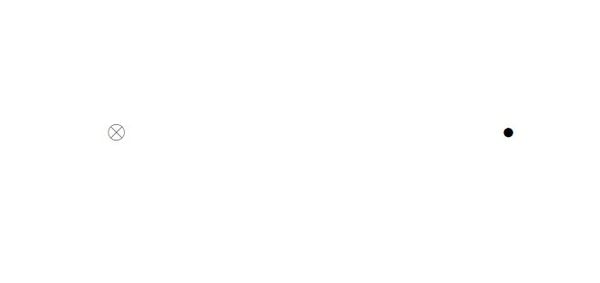
Close your left eye and focus with your right eye on the cross. Starting only a few centimeters (say 2 inches) from the screen, move slowly away from the screen. At some point the black spot should disappear. Increase the distance more and the spot will reappear. If you don't see this at first, make sure you are looking with your right eye and that you are focused on the cross. It's the dot that will simply become invisible at just the right distance.
Measure the distance at which the spot vanished, and the separation of the cross and spot on the screen.
8. What were these distances?
A blind spot test for your left eye is in Wikipedia on the web.
The blindspot usually is about 15 degrees off the fovea at the center of the retina. When you look at something (like the cross) you put its image on the fovea, where you see detail best. The image of the dot is then on the blindspot where the optic nerve enters the eye. If you know the diameter of the eye, it is a simple calculation to find the location of the optic nerve on the back of the eye from this measurement.
One way is by making a drawing on a large piece of paper. An example of what it would look like is shown below. Try to reproduce this yourself by taking a blank sheet of paper and using a coin (a U.S. quarter is about right) to represent the eye. Draw a circle around the coin, and a line through its center like this:
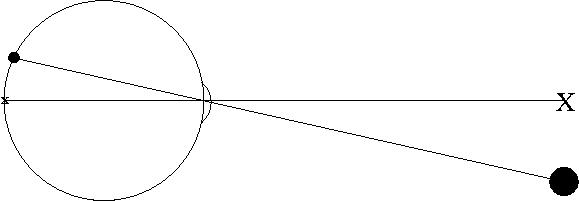
The circle prepresents your eye, and the line is the light ray from the cross to the center of the retina where a sharp image is formed near the fovea.
Measure along this line to whatever distance it was that you found made the spot disappear. If it's more than 30 centimeters you will need a to use a big piece of paper, or tape two pieces together. To help you remember, but an X at the end of the line.
Put a dot below the X the same distance the dot was below the cross on the page you were looking at. Draw a line from this dot through the lens of the eye (on the circle) to where it meets the inside of the eye on the retina. That place on the retina is where the image of the spot is formed when you cannot see it -- the place where the eye is blind to an object in front of it.
You have now made a scale drawing of the eye and the paths of the light that made the images you saw.
Use a ruler with a millimeter scale (that's the fine division of a typical metric ruler, with 25.4 millimeters per inch). Measure on the drawing how far it is from the center of the back of the eye to the spot where the image of the dot would be. That's the location of the of the optic nerve.
9. How far is it from the center of your eye to the blindspot?
A limit to the detail the eye can see is set by several factors. One of these is very fundamental -- it is diffraction of light by the iris of the eye. When light goes through a circular hole it doesn't go straight through, but is deflected and scattered into the shadow of the hole. This is caused by the wave nature of light, and is a bigger effect for longer wavelengths. The finest detail that a lens of diameter D can resolve is given in seconds of arc by
Angle = 100 / D
if D is measured in millimeters. A telescope 100 millimeters in diameter (4 inches) can resolve about 1 second of arc. If the diameter of the lens of your eye is 5 mm, it should resolve detail as small as 20 seconds of arc. Recall that there are 60 seconds of arc in a minute of arc, 60 minutes of arc in a degree, and 360 degrees in a full circle. The apparent size of the full Moon is 1/2 degree, 30 minutes of arc, or 1800 seconds of arc .
Resolution Chart
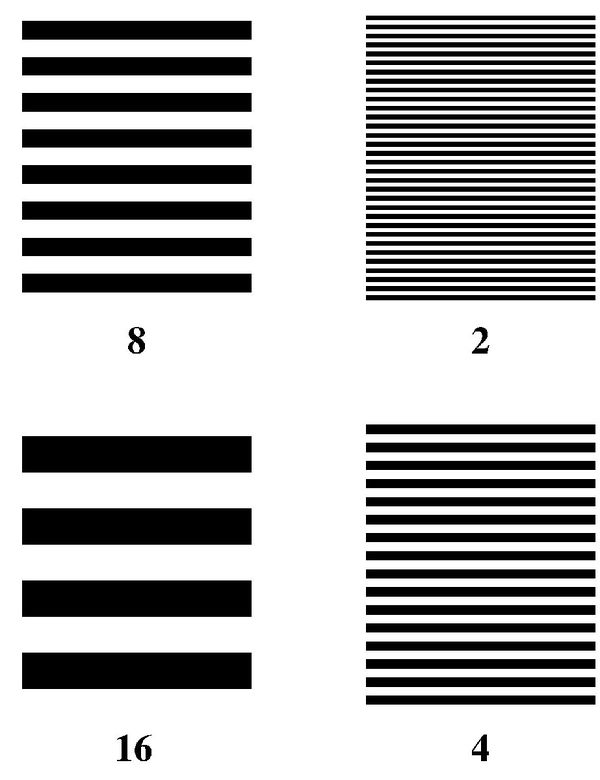
This is a resolution test chart. When you look at this chart from a large enough distance you cannot distinguish the individual lines.
You may try to use this on your computer screen, or print a copy from the pdf file you can download here. If you print it, the numbers are the separation of the dark bands in millimeters. On the screen, the separation may be different so measure it with a ruler that has a millimeter scale.
There are other reasons, though, that the eye has fuzzy images, not even counting our usual problems with correcting for near- and far-sightedness. The lens itself has a problem called spherical aberration. This is the same problem that the Hubble Space Telescope had before corrective optics were installed. Furthermore, there is only about 1 rod on the average for each 20 seconds of arc on the retina. In actuality we just cannot see as well as diffraction would allow.
To measure the resolution of your eye stand a few meters away from the chart. Identify which set of bars you can just resolve into individual lines. For this to work well you should be close enough that individual bars in one of the patterns are clearly seen, and far enough that the bars in one of the patterns are blended.
Once you have identified a chart that is just resolved, you need to know two things:
   * How many far apart (L) in millimeters are the lines on this chart?
   * How far were you from the chart (D) in millimeters?
To find the separation of the lines in millimeters, measure across a pattern, count the number of lines, and divide the distance by the number of lines to find L.
To find the distance you may need to know that there are 25.4 millimeters per inch, 25.4x12=305 mm per foot, and 914 per yard. There are 1000 millimeters in a meter.
The angular resolution of your eye in seconds of arc is
Angle = 3600 x 57.3 x L / D
where L is the distance between the lines in millimeters, and D is the distance from your eye to the chart in millimeters. There are 3600 seconds of arc in a degree, and 60 seconds of arc in a minute of arc.
10. How far from the chart were you when you made the measurement? What were the most closely spaced bars you could you see clearly? What is the angular resolution of your eye in seconds of arc?
Astigmatism
A lens may focus better for lines running in one direction. This phenomenon is called astigmatism, and in the eye it often results from a distortion of the cornea and lens. This is corrected with eyeglasses that are not rotationally symmetric. If you or a friend wear prescription glasses, hold the glasses at arm's length in front of you. Look through them at something on the other side of the room while you rotate the glasses. Keep the lens facing you as you do this. You will probably notice that what you look at will twist and distort as you rotate the glasses because the glasses have a curvature to compensate for your astigmatism.
You can identify whether you have astigmatism, and whether your glasses or contact lenses correct for it, very easily with a spoke diagram.
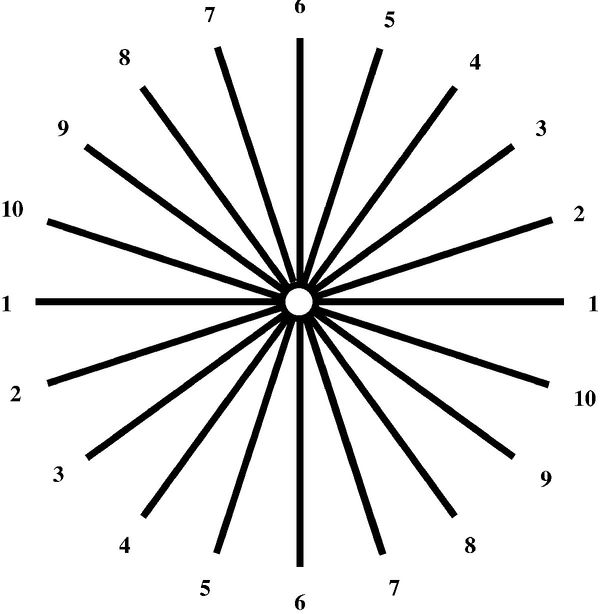
A spoke diagram for testing for astigmatism. When this chart is viewed from more than a few meters distance, some of the spokes will be sharp and others blurred if you have astigmatism.
11. Stand about 5 meters from the chart without your glasses on or remove your contacts if you wear them. If some of the spokes are fuzzy, and some sharp, which ones are sharpest? What happens if you rotate your head to the side? Why does that happen? Is it improved with your glasses or contacts? Cup you hand over one eye while you do this, because the astigmatism in each eye will be different.
Nearpoint
Your eye focuses on objects at different distances through the action of the ciliary muscles to change the shape of the lens. When you are young you can focus on things from a few inches to infinity in this away. With age the lens loses its flexibility and you cannot focus as well. Also if the distance from the lens to the retina differs from the appropriate value for the shape of the lens and cornea, the image will not naturally come to a focus on the retina, unless the object is very close (nearsightedness) or very far away (farsightedness). All of these conditions can be corrected with glasses.
Observe the printing on this page from different distances. If you wear glasses, try with them on and off. As you bring the page closer to your eye, you accommodate to the difference by changing the lens. While this action is mostly involuntary, you can feel the strain of looking at something that is closer than a foot or so away.
12. What is the closest distance for which you can see the page clearly? Does it help to see the page more clearly up close with glasses on?
By the way, when you use a telescope you should focus your eye for infinity. The telescope accepts light from a distant star over its full diameter, and funnels that light into a smaller beam that fits into your iris. The eye focuses this light on the retina, just as if it came directly from the star.
Iris
The eye responds to low and high light levels by changing the size of the iris. As its first response to dim light, the eye opens the iris to admit more light. The change in diameter is slow and fairly easy to see for yourself. Find a dimly lit space with a lamp (not so bright as to be uncomfortable) and stare directly at it. Then interpose a mirror between the lamp and your eye and watch your iris enlarge. The illumination on one eye affects the diameter of the pupil of the other. Look at a mirror about 5 inches away and hold a millimeter scale close to your eye so that you can measure the size of the pupil. Make a note of how large it is. Then cover the other eye and wait a few moments. Measure the pupil again. Uncover the other eye and you'll see the pupil contract. Try varying the room lights. Or sit in the dark a few minutes and then slowly turn up the lights so that you can just see the iris well enough to measure the pupil diameter Identify the extreme ranges of pupil size possible.
13. What are the minimum and maximum sizes of the pupil in millimeters?
The area of a circle is
Area = Pi x R x R = Pi x D x D / 4
where "Pi" is 3.14, R is the radius of the circle or D is its diameter. For example, the area of a circle 2 mm in diameter is 3.14 square millimeters. A 100 mm diameter telescope (4 inches) is a typical small telescope used by amateur astronomers. With an appropriate choice of magnification, all of the the light that is collected by the lens leaves the eyepiece and enters the pupil of a dark adapted eye.
14. How much more light does this 100 mm diameter telescope gather than an unaided eye with a 5 mm diameter pupil? What if the telescope were 10 meters in diameter?
Dark Adaptation
Normal daytime vision depends on both the rods and the cones. The rods are more sensitive to light, but they do not detect color. The cones are the color receptors, but they are less sensitive. At low light level your vision depends on the rods, rather than the cones. It also takes several minutes, sometimes up to half an hour, to adapt to low levels of light.
Find a time and place where it is as dark as possible, perhaps at night or in a room with no windows. Wait for at least five minutes and the pupils of your eyes will be fully dilated. The biochemistry of the photoreceptors in your retina has started to favor the rods. Even when the lighting is very faint you may see some things in the room. You probably won't see very well, and you probably won't see any color. The color sensitive cones don't function at low light levels.
Make a note to yourself (it will be too dark to write) about how the scene looks. Turn on the lights in the room to full brighness, wait a minute or so, and then turn them off again.
15. Describe how you could or could not "see in the dark", and what happened to your night vision after being exposed to bright light. After the exposure to bright light, how long it take for your vision to adapt to darkness?
The Sky at Night
Wait for a night when it is at least partly clear so that you can see some sky. Find a safe, convenient location, and take a few minutes to look up. Think about what you see, given the experiments you have done here.